
Laravel 5.5 Introduce Custom Validation Rules
Table of Content
- Introduction
- Creating Custom Validation Rules in Laravel
- Creating Custom Validation in Laravel Using Exits Rule
- Custom Validation Rules Example
- Conclusion
Introduction
The most popular PHP framework, Laravel, has a number of prebuilt features, one of which is validation criteria that can be added to your application’s input forms. Nonetheless, beginning with Laravel version 5.5 (with new features in Laravel 9.0), you may utilize the rule object to provide your own custom rules. This is a helpful artisanal quality. This is useful for developing a bespoke Laravel application that will collect user input in a manner that is unique to each individual. This article will serve as a manual for developing your own set of validation criteria. Laravel 5.5 introduces custom validation rule support. Using Laravel’s custom validation, you may add checks to your application that are not already part of the framework.
When working with Laravel, you will have access to a wide variety of validation rules that can be used to validate the request’s validity. With the assistance of any of the Professional Laravel Web Development Companies, establishing the validate method, which is currently an inherent part of the Request object, would be simple. Your code will continue to run if the validation rules is successful; otherwise, an error notice will be displayed.
Creating Custom Validation Rules in Laravel
The method that is utilized by Laravel to generate custom validation rules and to establish a connection between those rules and classes is a somewhat complex one. These custom validation rules will help you line up your custom classes, and if you need to include it in your project and it’s getting too complicated, you should hire laravel developers from India who are skilled in the technology stack and can help you solve the problems and make good solutions.
If you are working on a challenging project and find that creating these specific validation criteria is becoming too much for you to handle, you might want to consider hiring in developers from India. These developers are well-versed in the relevant technology stack and can aid you in addressing any issues that have emerged while providing high-quality final solutions. They can also help you with any questions you may have regarding the technology stack.
Let’s make life easier for ourselves by beginning with a form that only needs the user to provide their name and email address. This will get us off to a good start. The following is a command that you may use to inquire about anything that you are interested in obtaining: PHP artisan make: request StoreCustomerRequest
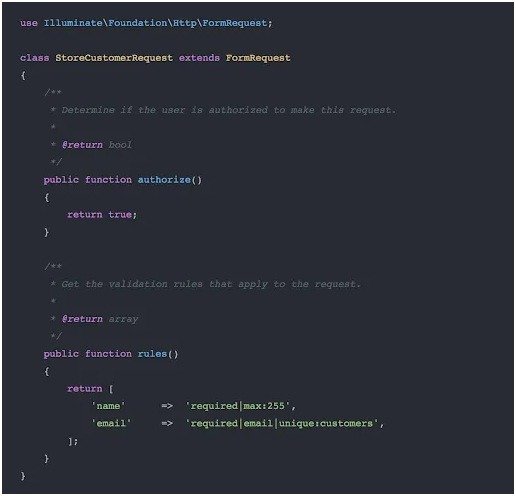
As can be seen, the class already has two methods that have been implemented:
- Authorize Method: In the Authorize method, the criteria that must be met before access may be granted are laid down. You could use this information to figure out who else has access to these files by seeing who else has access to these files.
- Rules Method: When implementing validation, you should do it in the rules method. At this time, both names and email addresses are being reviewed.
Creating Rule Class: We recently saw how easy it is to construct a Customer Model with the contact information like names and emails. Let’s go ahead and implement some regulations to ensure the accuracy of this information. To set up a new rule, type the command shown below and hit enter.
- PHP artisan makes: rule UpperCase: If you run this command, Laravel will make a new Rules folder inside the application’s root directory. Additionally, UpperCase.php, a class file, will be added to the same directory.

- Adding Validation Logic: Let’s add the validation rules and logic once we’ve built the class containing them. In this scenario, let’s assume that the name is capitalized. Our passes functionality has to be updated, thus we will do that now.
- Using validation rule in form request class: Let’s go ahead and include the validation in the form request class we just built, now that we’ve generated the validation rule. We can get started with implementing this new class by first importing it into our request class. The following code will allow us to import: use AppRulesUpperCase. After we’ve successfully imported the class, we can modify the rules() function. There is now an additional check for compliance with the naming conventions. There is now an UpperCase object in existence. UpperCase is created and the passes() method is called by the rules() function to ensure a proper case.
Creating Custom Validation in Laravel Using Exits Rule
We may construct custom validation logic using closures and extends instead of rules classes.
Before we get further into extends and closure, let’s clarify our knowledge of establishing rules using custom validation. A custom rule will be set up to determine whether or not the number entered in the text field is an even number. So the first step is to construct our rules class. The artisan’s make: rule command is what we need to run. This command creates our rule class: PHP artisan make rule IsEvenNumber.
The command produces the class shown above. It requires two functions. passes() returns if validation passed. Message () customizes error messages. Using modulo, we may determine if a number is even in passes. The rule may be implemented now that it has been described.
1. Custom Validation Rule Using Closures
After we understand how to create our own validation rules using the make: rule command, we can move on to studying closures and how they may be used to build new commands. The concept of a validation rule remains constant, but its implementation may vary.
Attribute, value, and fail are the three inputs to the function inside of it. That which is being verified is known as an attribute, and the field being validated is an attribute field. In this instance, value represents the object’s actual value and failure represents the callback method that will be triggered if validation fails.
2. Validation Rule using Custom Method
Using the extend method is another approach that may be taken to create a validation rule. This additional approach is available via the validator facade. If you are just intending to utilize the validator in a single location, it is highly recommended that you create the validation rule by making use of the extend method.
The addition of our validation rule will take place in this approach. This validator accepts four inputs, which are the attribute, the value, the parameter, and the validator itself.
Custom Validation Rules Example
Step 1: Create Custom Validation Rule
To begin, we will use the ensuing command to establish our own set of validation standards. Using the below commands, we can construct a Validation rules file on which to base our reasoning. Now, please execute the following command: php artisan make:rule CheckAgeRule
After running the program, a “rules” folder will appear in the app directory. You may also locate CheckAgeRule.php in the rules folder. We only need to put some logic in there: if the user enters an even number, we should do something, else, do nothing. The file should look like this: app/Rules/CheckAgeRule.php
<?php
namespace App\Rules;
use Illuminate\Contracts\Validation\Rule;
class CheckOddEvenRule implements Rule
{
/**
* Create a new rule instance.
*
* @return void
*/
public function __construct()
{
}
/**
* Determine if the validation rule passes.
*
* @param string $attribute
* @param mixed $value
* @return bool
*/
public function passes($attribute, $value)
{
if($value%2 == 0){
return true;
}
}
/**
* Get the validation error message.
*
* @return string
*/
public function message()
{
return ‘The :attribute must be even value.’;
}
}
Step 2: Add Rules
In this step, we must add two routes: one for creating the form and another for the post method. hus, enter routes/web.php, and add the route after that.
Route::get(“form”,”FormController@index”);
Route::post(“form”,”FormController@store”);
Step 3: Create Custom Validation Controller
To precede, a new controller, the Custom Validation Controller, must be created. Simply build a new controller by running the command below. Using the controllers down below, you may make your own: PHP artisan make: controller CustomValidationController
The new file, named CustomValidationController.php, may be found in the directory after the following command: app/Http/Controllers/CustomValidationController.php.
<?php
namespace App\Http\Controllers;
use Illuminate\Http\Request;
use App\Rules\CheckOddEvenRule;
class FormController extends Controller
{
/**
* Display a listing of the resource.
*
* @return \Illuminate\Http\Response
*/
public function index()
{
return view(‘myForm’);
}
/**
* Display a listing of the resource.
*
* @return \Illuminate\Http\Response
*/
public function store()
{
$input = request()->validate([
‘name’ => ‘required’,
‘number’ => [
‘required’,
new CheckOddEvenRule()
]
]);
dd(“You can proceed now…”);
}
}
Step 4: Create View File
Let’s finish off this example by creating a customValidation.blade.php file. In this file, we’ll design a form and display a validation error message. This will bring the whole thing to a close.
resources/views/customValidation.blade.php
<!DOCTYPE html>
<html>
<head>
<title>Laravel 5.5 custom validation rules example</title>
<meta charset=”utf-8″>
<meta http-equiv=”X-UA-Compatible” content=”IE=edge”>
<meta name=”viewport” content=”width=device-width, initial-scale=1″>
<link href=”//netdna.bootstrapcdn.com/bootstrap/3.2.0/css/bootstrap.min.css” rel=”stylesheet”>
</head>
<body>
<div class=”container”>
<h1>Laravel 5.5 custom validation rules example</h1>
<form method=”POST” action=”{{ url(‘form’) }}”>
{{ csrf_field() }}
<div class=”form-group”>
<label>Name:</label>
<input type=”text” name=”name” class=”form-control” placeholder=”Name”>
@if ($errors->has(‘name’))
<span class=”text-danger”>{{ $errors->first(‘name’) }}</span>
@endif
</div>
<div class=”form-group”>
<label>Number:</label>
<input type=”number” name=”number” class=”form-control” placeholder=”Number”>
@if ($errors->has(‘number’))
<span class=”text-danger”>{{ $errors->first(‘number’) }}</span>
@endif
</div>
<div class=”form-group”>
<button class=”btn btn-success btn-submit”>Submit</button>
</div>
</form>
</div>
</body>
</html>
Conclusion!
There has been a considerable increase in the number of web developers that are utilizing the Laravel framework. When compared to other frameworks in its category, the capacity of Laravel to conform to the precise specifications demanded by a given project stands out as a significant benefit that should not be overlooked.
Additionally, the default installation includes the great majority of the available functionalities. Users may take advantage of Laravel’s extensive collection of validators in their requests to guarantee that the information they are submitting is accurate. Because of this, it is necessary to employ employees who have prior expertise developing in Laravel.
On the other hand, there are some circumstances in which we are in dire need of a validator that has been modified especially to fulfill the specifications we have outlined. If you so desire, Laravel enables you to build your very own validators from the ground up. Several different implementation options for these validators have been explored and explained during the course of this work.
Both the validator’s Closure and Extends function and the make: rule command has the ability to be used in order to create the ruling class. However, only one of these options will actually be used. In addition to this, we made an attempt to officially design a difficult case study in order to validate the Olympic year. This was done in order to validate the Olympic year. We have provided you with this information in the hopes that it would prove useful to you the next time you have to build a custom validator or hire Laravel developers that can help you out effectively.


About Author
Nicole
I am the admin at 10TechDesign. I am also a technical blogger and digital marketing expert. I handle all internet marketing-related activities at 10techDesign along with his team.